Tuesday, October 22, 2019

15 Of The Best Makeup Brands In India That Are Trending In 2019

15 Of The Best Makeup Brands In India That Are Trending In 2019

15 Of The Best Makeup Brands In India That Are Trending In 2019


Importance Of Choosing The Right Makeup

Before we move on to our round-up, here’s something you need to know: choosing the right brand of makeup is a big decision you make for yourself. The skin on your face is especially delicate, and if you want to look after it well, you will have to invest in quality cosmetics. Also, if you are strongly against animal testing, you should steer clear of brands that test on animals.

These 15 brands have launched a whole range of makeup, from lipsticks and foundations to primers and bronzers. We hope to make choosing makeup easier for you as we have listed the best brands and the best makeup products they have to offer. Let’s have a look at the list now, shall we?

Natural Makeup Look – A Step By Step Tutorial With Pictures

Natural Makeup Look – A Step By Step Tutorial With Pictures

  • Lightweight, hydrating moisturizer
  • Radiance primer
  • Luminizing foundation (or a lightweight one)
  • Concealer
  • Eyelash curler
  • Mascara
  • Eyeliner pencil in black
  • Bronzer
  • Cream Blush
  • Lipstick

Prepping Your Skin

Prepping your skin is key to slaying this look or any look for that matter. Make sure you cleanse, tone and moisturize your face properly with a lightweight moisturizer before you begin. It’s crucial to prep your skin with a primer – and the best option would be to choose a radiance primer like the Estee Lauder – The Illuminator Radiant Perfecting Primer. This will give you an ultra smooth base and will help your foundation glide on like a dream. You’ll also have a super fresh, glowy finish.

Applying Your Foundation


Pick a lightweight foundation or a tinted moisturizer in a shade that exactly matches your skin tone. If you can’t seem to find your exact shade, mix two shades for a flawless finish. Try the Maybelline Dream Flawless Nude Fluid- Touch Foundation if you want to achieve that dewy, fresh glow. Use a buffing brush to blend in the product. We recommend the Real Techniques Expert Face Brush – it buffs in the formula incredibly well and your skin looks skin-like, rather than giving your face a masked look. Now, the trick to make your face look like it has nothing on is to buff, buff, and buff some more. So take some time to do this in detail.

Step 3: Time For Concealer

Brightening your eyes and banishing any dark spots or redness is what’s next. Use a concealer that you love. We recommend trying the Maybelline Fit Me! Concealer – it’s super pigmented, it won’t crease, and it stays put all day long! Draw a V-shape underneath your eyes – like an inverted triangle, and use your buffing brush to buff the product out, until you can’t see any harsh lines or patches. Remember, blending is key!

Step 4: Moving On To The Eyes

Once you’re done with your base, it’s time to enhance your eyes (in the most subtle manner possible.) Start by curling your lashes using a high-quality eyelash curler. We recommend trying the Revlon Lash Curler No. 8 – it’s of great quality and is affordable at the same time. Once you achieve your curl, it’s time for mascara! If you want to volumize and lengthen your lashes with one product – the Maybelline Lash Sensational Mascara does wonders to give you gorgeous, fluttery long lashes. One layer of mascara does the trick for this look – for both your upper and lower lashes. Next, use a black eyeliner pencil to tightline your upper lash line, to give an illusion of thicker and darker lashes. We can’t get over the Urban Decay 24/3 Glide-On Eye Pencil in black – it’s extremely pigmented and long-lasting.
It’s also a great idea to groom your eyebrows and add some definition – nothing too major since it’s all about subtlety. Use a brow powder to fill in sparse areas of your brows, and apply it with a thin, flat angled brush.

Step 5: Warm It Up With Bronzer

When we say bronze it up a notch, don’t go overboard because this look is all about keeping it simple. Use a subtle bronzer and slightly brush it along your cheekbones and hairline to warm it up a bit. Try the Too Faced Chocolate Soleil Matte Bronzer to create an over-warmth – it’s infused with 100% real cocoa powder!

Step 6: Add A Flush Of Color To The Cheeks

For your blush, cream blush without any kind of shimmer or glitter looks most natural. It has a texture similar to that of your skin and is also very sheer. For a lit-from-within effect, try the Stila Convertible Color – it’s a cheek and lip cream, and it gives you that perfect, translucent color. Use a blush brush and put a little bit on your cheeks, blend it out well with your buffing brush.

Step 7: Perfect Your Pout

Add some color! The perfect lip color is one of the secret ingredients to a stunning no-makeup makeup look. Depending on the shade of your blush, there are a few ways you can go – if your blush is coral or a brighter pink – tone it down with a muted lip color or a tinted lip balm. If you want a natural pink shade – try the M.A.C Lustre Lipstick in Syrup. Pick a shade that is closest to your natural lip color – for that “my lips, but better” look.

Voila!

And ladies, that’s how it’s done! A fresh, lit-from-within, no-makeup makeup look that you can literally wear every day – whether it is to work or to a movie date. Also, it’s great for every season!

Tips: How To Nail The Natural No Makeup Makeup Look

Now that you know what products you can use and the techniques you can try to achieve a naturally gorgeous look, here are a few tips, tricks, and hacks to nail this look even more!
  • Invest in good skin care products and make sure you always keep your face well hydrated. Remember, the basis of this look is to showcase and embrace your natural face – so make sure you take proper care of your skin and follow a healthy and nutritious diet.
  • Always exfoliate your lips beforehand with an old toothbrush and some lip balm to get rid of that nasty dead skin. Who doesn’t love soft, supple lips?
  • The main trick is to go light-handed with your cosmetics – a natural makeup look is far more attractive as opposed to the heavy, full-glam face.
  • When it comes to your eyes, opt for definition and not drama. A great tip is to apply a black or brown eyeliner pencil to the top waterline of your eye. After applying it, shut your eyes really tight – this helps push the pigment of color into the roots of your lashes while deepening the appearance of your natural lash line. Finally, take a cotton bud and remove the majority of the pencil from your waterline – this way your lashes will look naturally defined sans the harsh lines!
  • Don’t use your bronzing powder all over your face – this will give you that fake tan appearance. For a more natural finish, apply it around the outside edge of your face and lightly under the cheekbones.
  • For your lips, try not to go with a bold pigmentation of your lip color. Make it softer by dabbing on a lip stain and diffusing the color with your finger.
  • Use a clear brow gel to set your eyebrows in place. This little step will add so much structure to your face by grooming those brows and keeping them in place all day.

Saturday, October 19, 2019

3 Easy Halloween Makeup Effects

3 Easy Halloween Makeup Effects 

By now, a lot of you probably already have your Halloween looks ready to go. But for those who haven’t had time to plan, let alone think of, a costume, we’re here to help! With the right statement makeup, you may not even need a full getup. These three effects are super easy to create, and you probably have the majority of the products already. Just remember to be safe!Only use products that are safe for use on and around your skin, lips, and around the eyes.
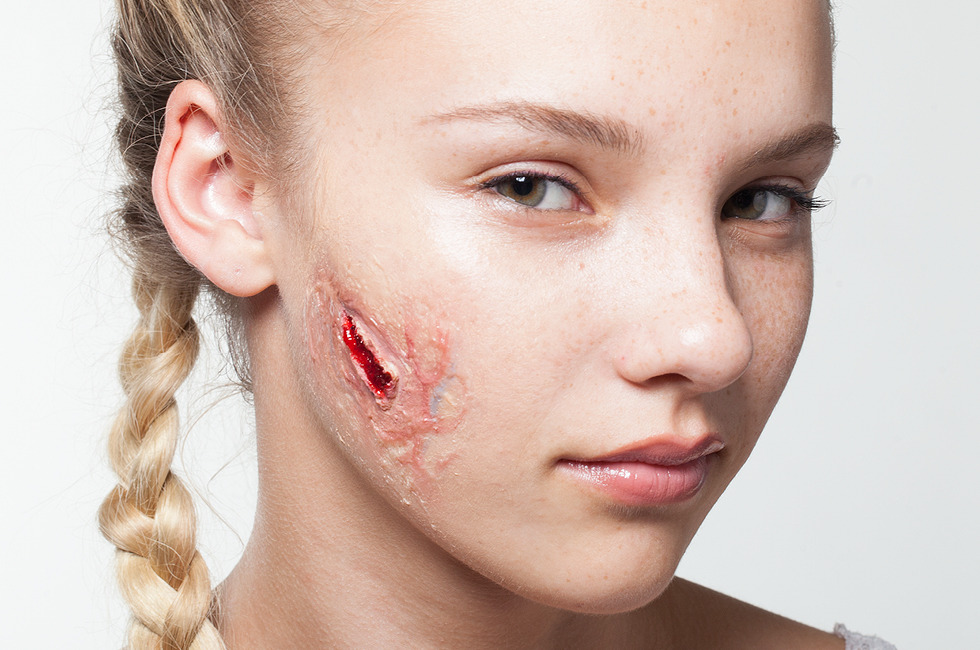
Quick and Easy Scar

Getting bloodied up? Here’s how to slash and gash in minutes!
HALLOWEEN MAKEUP EFFECTS: Quick and easy scar
You will need: Mehron 3-D Gel Gelatin Effects in Red and Flesh Tone, scar kit (we used Woochie Special FX Gash Set; you can buy these anywhere Halloween goods are sold), cotton swabs, latex sponge, spirit gum adhesive or any skin-safe adhesive 
1: Using a cotton swab, apply 50% alcohol to skin you want to “scar” to remove any oil residue.
2: Choose a scar and spread a generous amount of spirit gum (adhesive) on the backside. Figure out where you want it, and stick it on and pull it off a few times to make the area of skin tacky.

HALLOWEEN MAKEUP EFFECTS: Set the scar

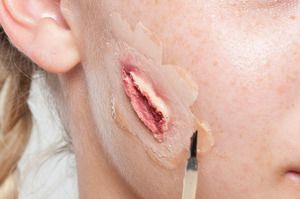
3: Once the scar is set, press down on the edges to make sure nothing is sticking up. If you find that edges aren’t staying in place, apply more adhesive on top and around the edges, press down and smooth out.

HALLOWEEN MAKEUP EFFECTS: Apply 3D gel

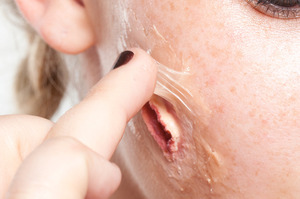
4: Apply 3-D gel in Flesh Tone using your fingers. Blend the product around the edges of the scar. Let it dry.

HALLOWEEN MAKEUP EFFECTS: Apply foundation

5: With a latex sponge, dab a small amount of foundation in and around the scar to blend it all together. Use a makeup brush to clean up any edges and finish blending.

HALLOWEEN MAKEUP EFFECTS: Create blood

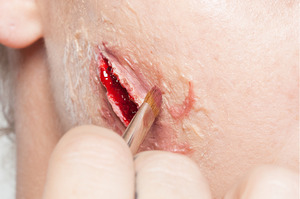
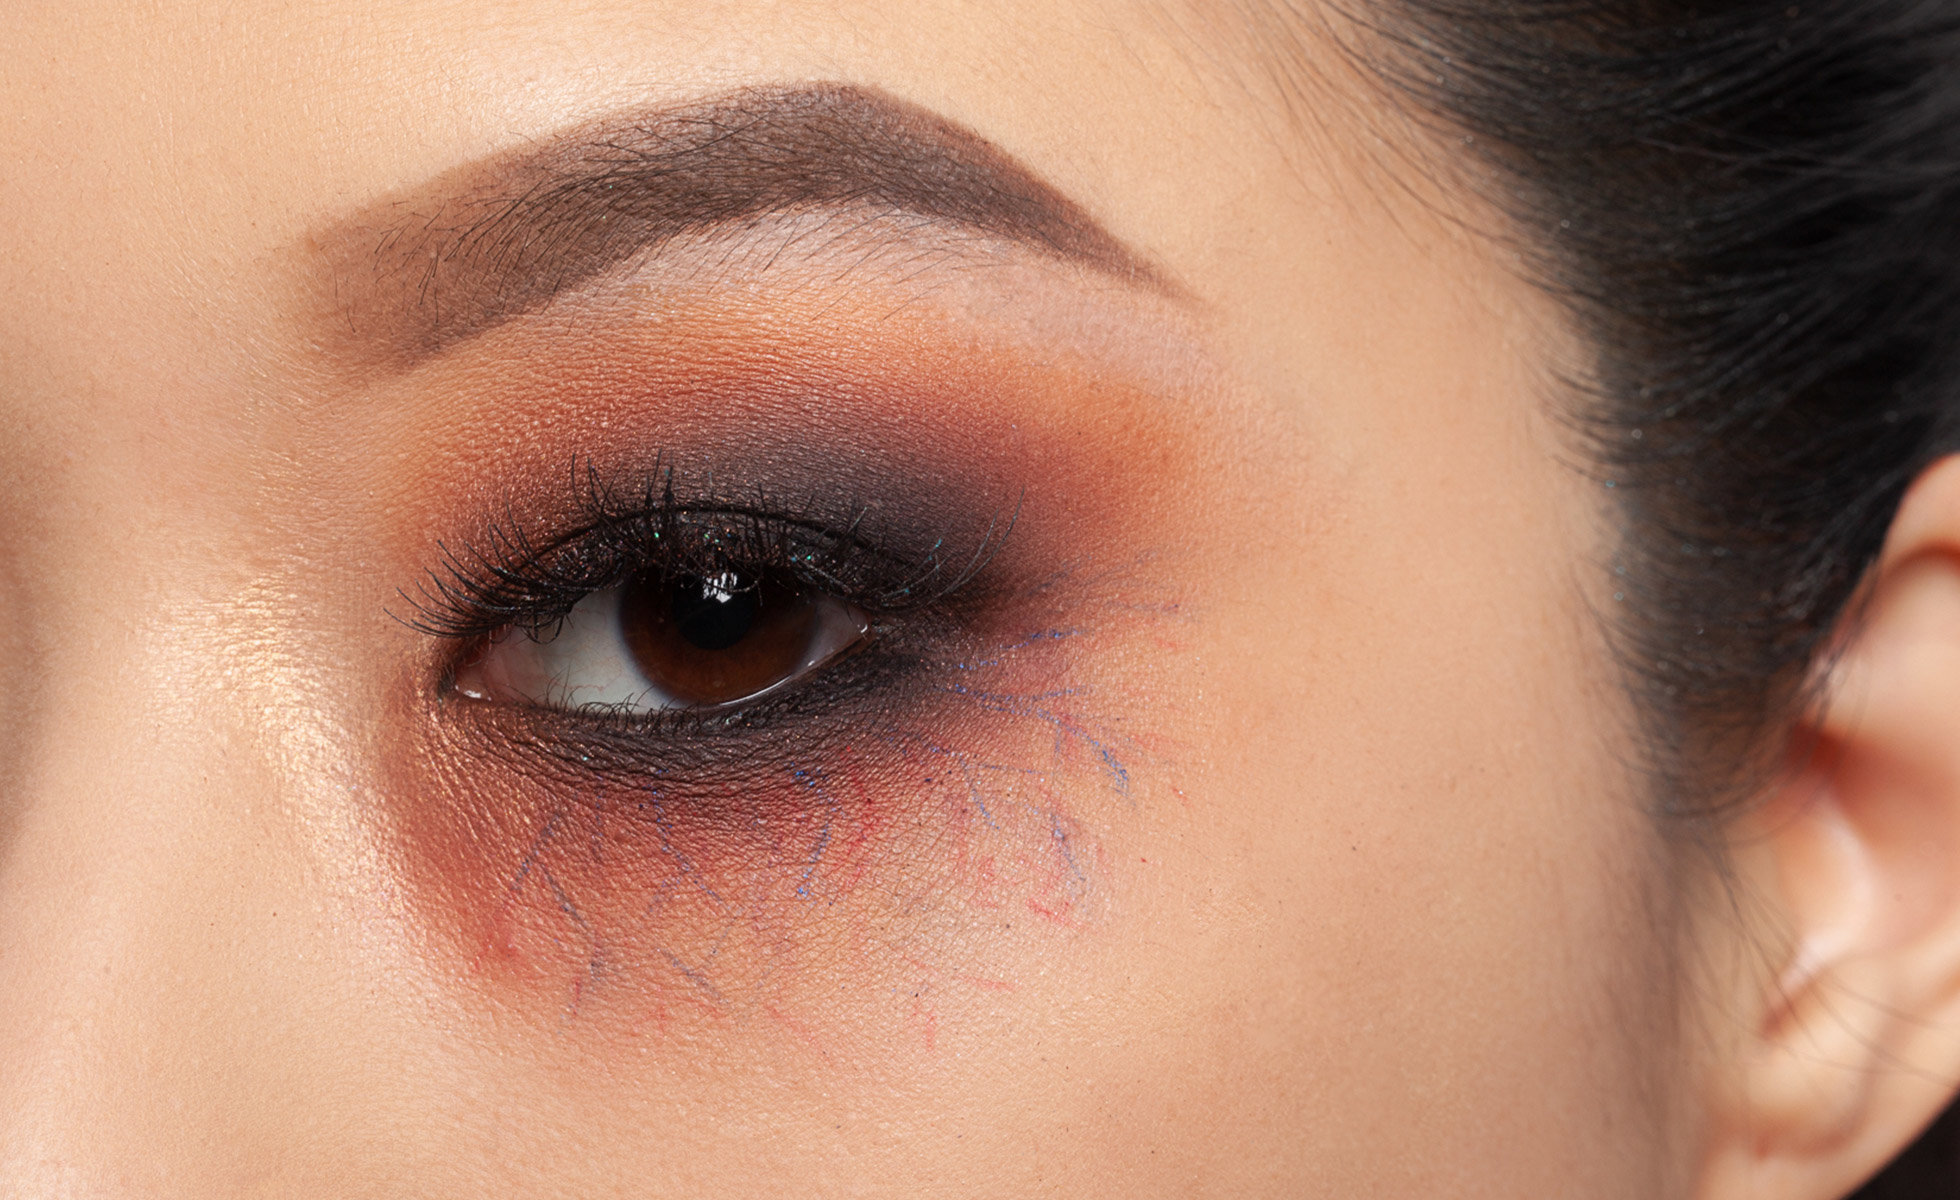
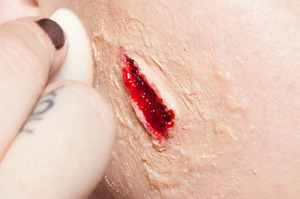
6: To finish, create “blood” on the wound by applying the Red 3-D gel with a brush. You can also add veins and cuts around the scar, using makeup in realistic colors like red, brown, and blue.
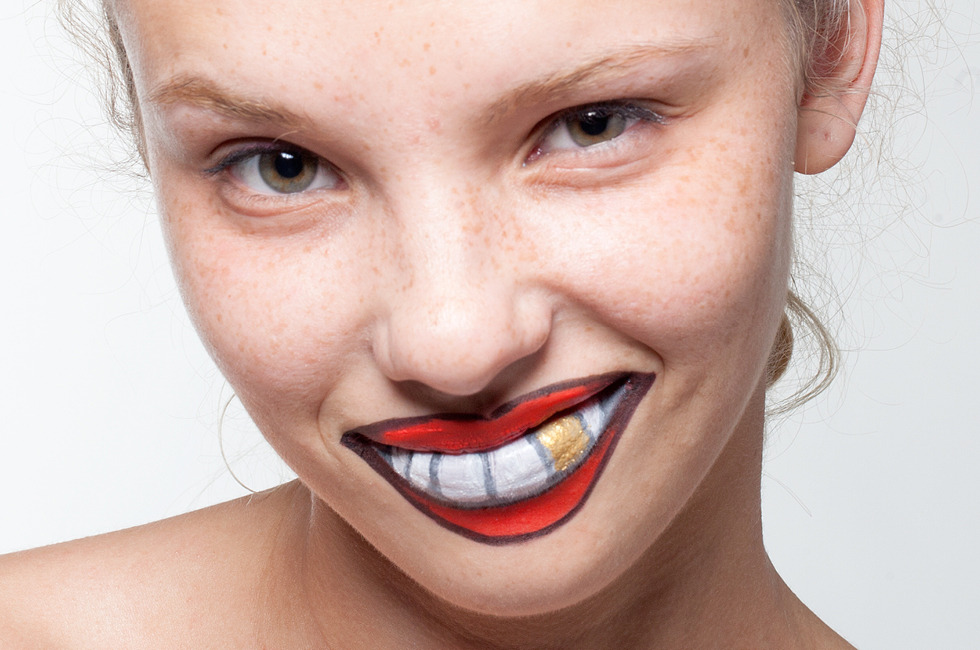
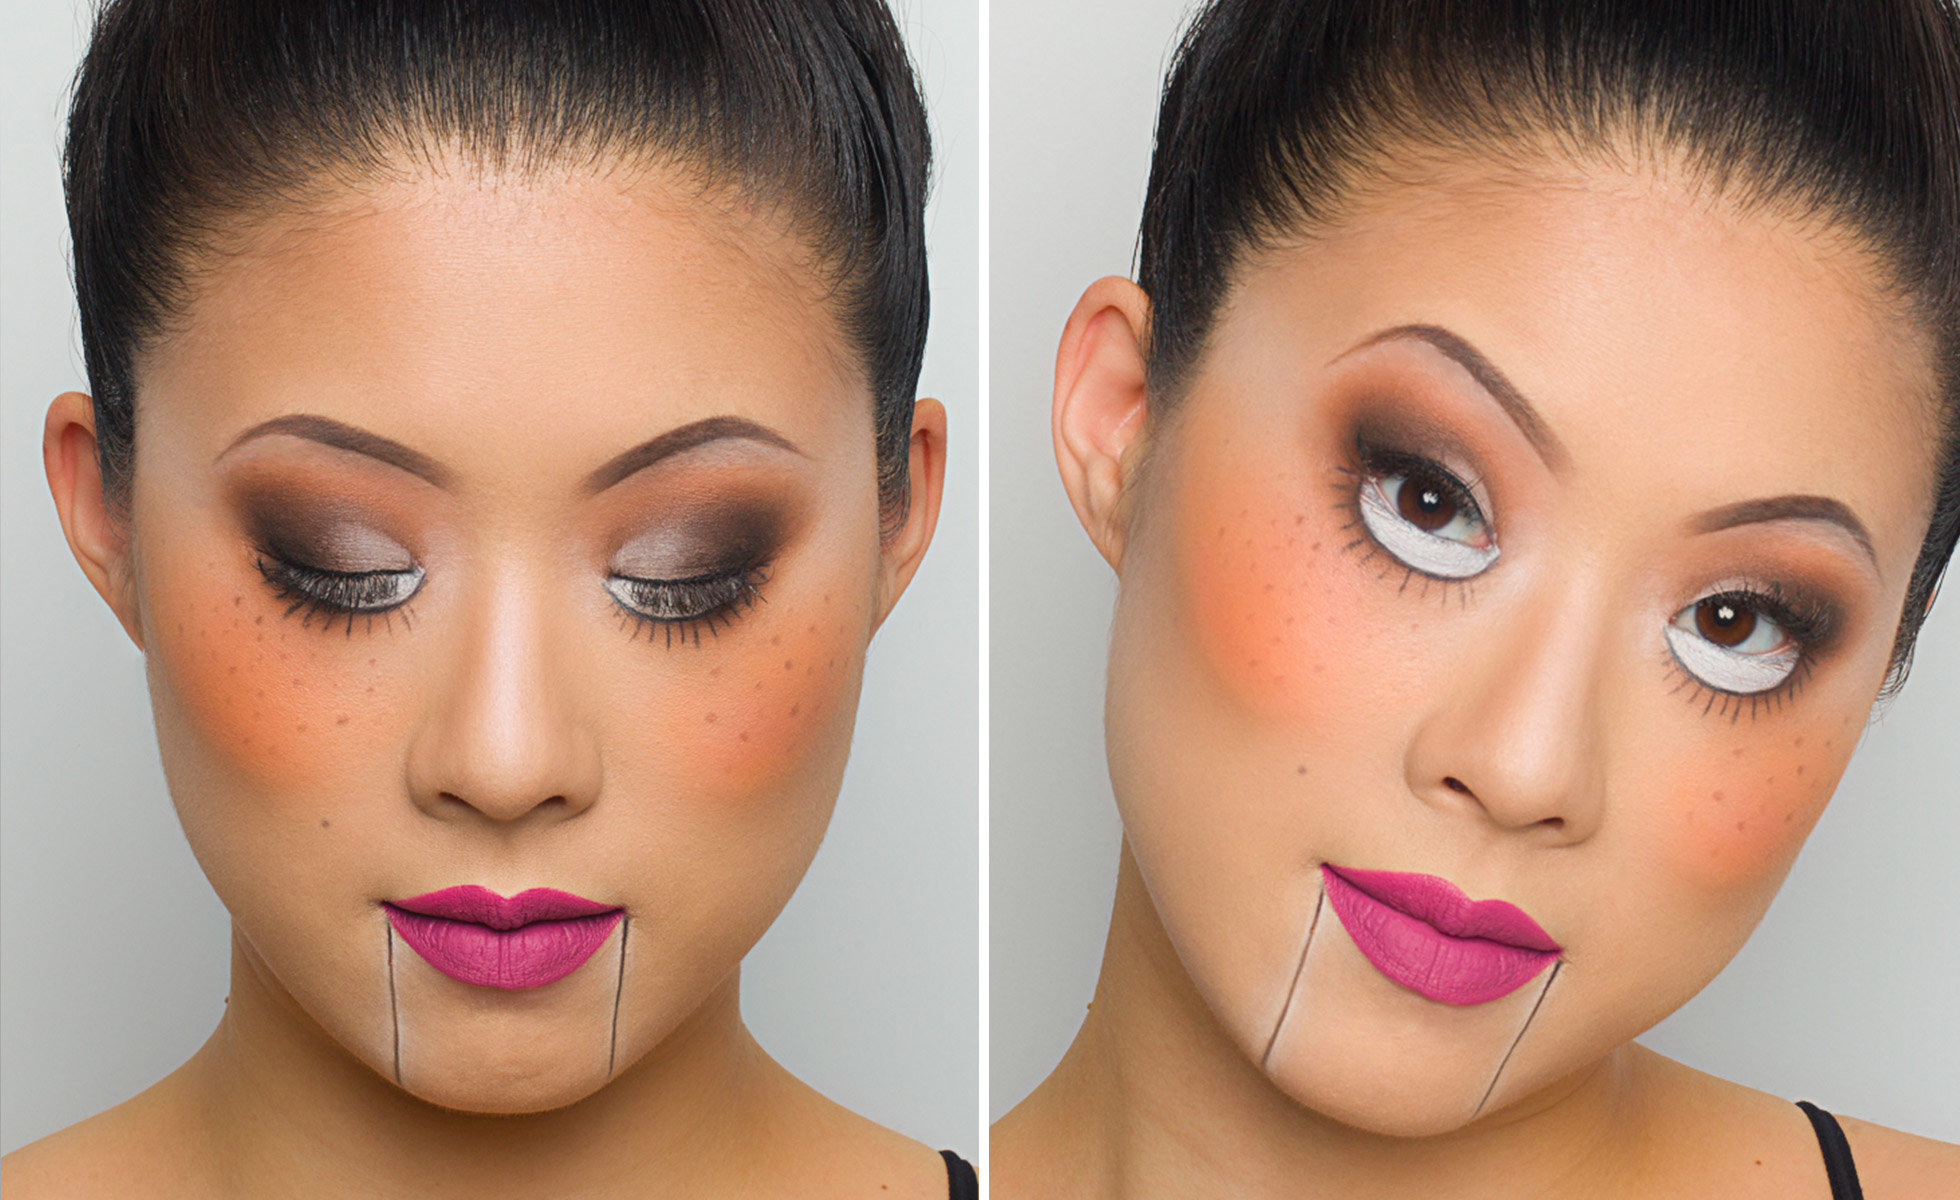
The model is wearing: Kevyn Aucoin The Essential Lash Mascara in black, Anastasia Perfect Brow Pencil in medium brown, Kevyn Aucoin The Flesh Tone Lip Pencil in medium, Make Up For Ever 12 Flash Color Case face colors, Inglot Cosmetics AMC Lip Paint in 63 , Mehron 3D Gel in red and flesh tone, and Woochie Special FX Gash Set

Dummy Mouth

Slightly silly, super creepy, and so easy.
HALLOWEEN MAKEUP EFFECTS: Dummy mouth
You will need: lip brush, face makeup in white, red, grey, and brown (we used Make Up For Ever Flash Color Case)

HALLOWEEN MAKEUP EFFECTS: Cover the bottom lip

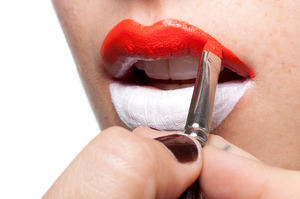
1: Cover the bottom lip in white face makeup and the top lip in red using a lip brush.

HALLOWEEN MAKEUP EFFECTS: Outline

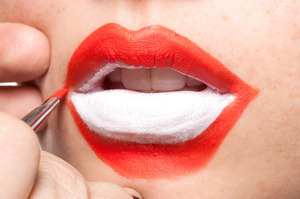
2: Now you’ll create the outline of a new bottom lip in red. Using the same brush, extend the corners of the lips outward, create a line following the shape of the lip and fill in completely as pictured.

HALLOWEEN MAKEUP EFFECTS: Outline with brown

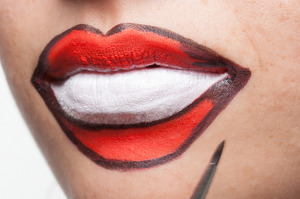
3: Outline the red lips in brown and shade in the corners to add shadows.

HALLOWEEN MAKEUP EFFECTS: Paint grey lines

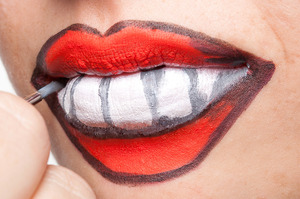
4: Create teeth by painting grey lines vertically over the white, and shade in the corners a bit.

HALLOWEEN MAKEUP EFFECTS: Paint a gold tooth

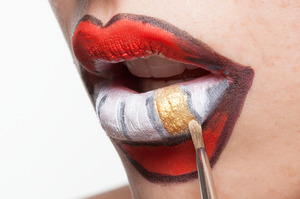
5: Do variations! Paint a tooth gold or black—it’s up to you!
The model is wearing: Kryolan Aquacolor in Lake, 521, 079, and 517, Make Up For Ever 12 Flash Color Case face colors
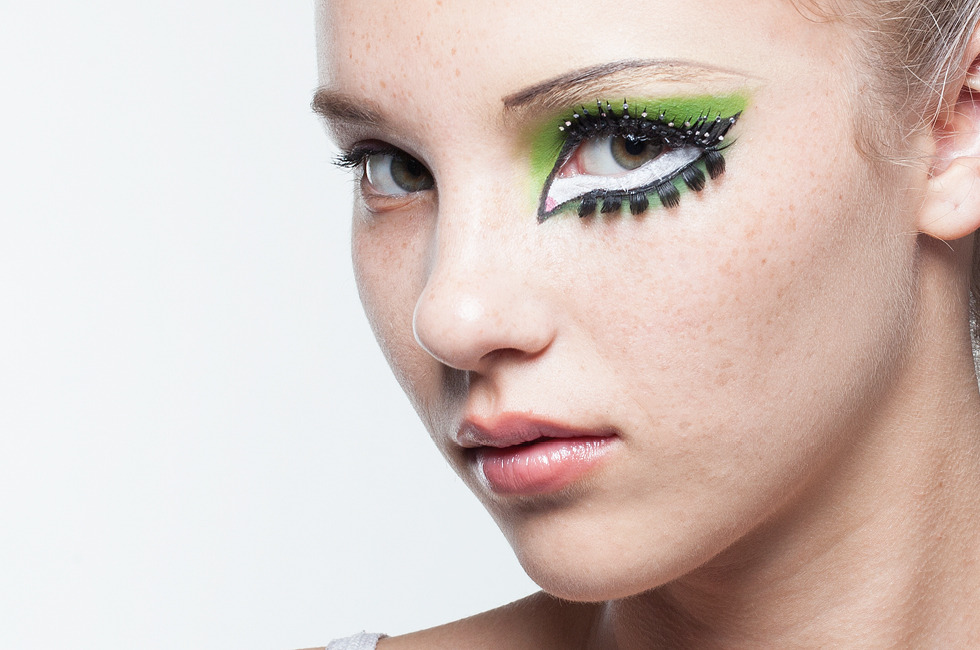
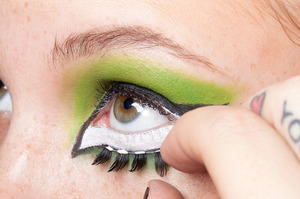
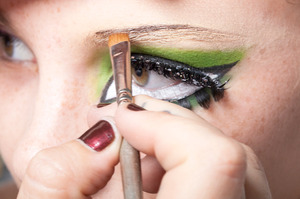
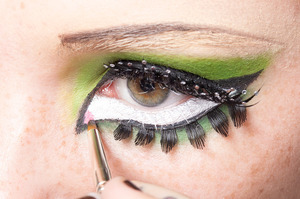
Cartoon Cat-Eye

Play with falsies and painted shapes for an eye-catching look.
HALLOWEEN MAKEUP EFFECTS: Cartoon Cat-Eye
You will need: cream gel eyeliner in white, black cream eyeshadow or eyeliner, 2 different green eye shadows, dark brown brow gel, pencil, or powder red cream eye shadow, foundation, disposable mascara wand, brushes

HALLOWEEN MAKEUP EFFECTS: Outline the eye

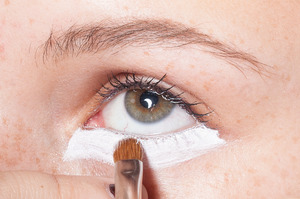
1: Start by using white, paint the outline of the pictured shape (pointed at the corners, and curved to follow the shape of the eye) and fill in. Cover your bottom lashes completely, too.  
2: Using the same white, line the outer corner of the top eyelid using a white gel eyeliner and flat makeup brush. Connect to the end of the bottom swoop.  

HALLOWEEN MAKEUP EFFECTS: Outline the white shape

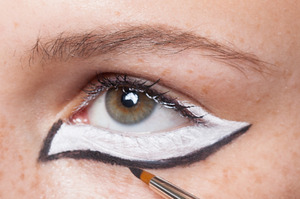
3: Use a black cream eye shadow and thin brush to outline the white shape. You will treat this black line as the [new] lower eyeline.

HALLOWEEN MAKEUP EFFECTS: Apply emerald green

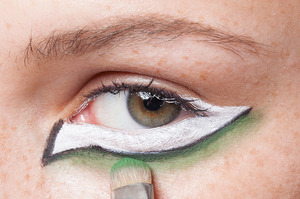
4: With a flat blending brush, apply emerald green shadow beneath the [new] eyeline, following its shape.
5: Next, cover the entire eyelid with a lime green cream shadow, extending the edges so the shape mirrors the one you drew under the eye. Blend well.

HALLOWEEN MAKEUP EFFECTS: Wing it up

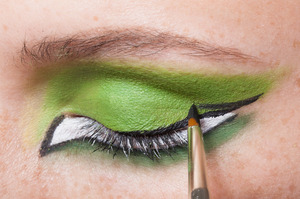
6: Using a fine-tip brush, line the top lashline with black, extending the line out to where the color ends. Wing it and fill in to make a thick line.

HALLOWEEN MAKEUP EFFECTS: Apply false lashes

7: Now you’ll apply false lashes to your [new] lower eyeline. Apply glue to one strip; make sure there’s a generous amount on the inner and outer corners. Wait 10 seconds and place upside down. Let it dry.

HALLOWEEN MAKEUP EFFECTS: Fill in spots

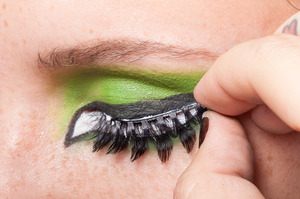
8: The other two strips go on the top lash line. To start, apply one strip (as you did in step 7) but place it right-side up. Once the first strip is dry, repeat with the third strip as a second layer. Softly squeeze the strips together. When the lashes are all dry, fill in any spots of clear glue with black eyeliner.

HALLOWEEN MAKEUP EFFECTS: Brush over brows

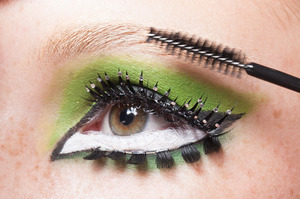
9: Cover your mascara wand in foundation, and brush over brows.

HALLOWEEN MAKEUP EFFECTS: Paint a thin line

10: Over the top half of the brow, paint a thin line in a dark brown, creating a sleek arch.

HALLOWEEN MAKEUP EFFECTS: Pain a small red dot

11: Paint a small red dot on the [new] bottom  inner corner. 

Create 5 Last-Minute Halloween Looks Using the Soft Glam Palette!

Create 5 Last-Minute Halloween Looks Using the Soft Glam Palette!

I’m kind of a Halloween fanatic. Every October I set aside time for haunted hayrides, pumpkin carving and “Halloweentown” marathons, but always wait until the last second to find a costume. With the haunted holiday approaching, I can feel the evil goblin of procrastination creeping up on me again.
I always fall into the same wicked cycle: 1 - Dream up an elaborate DIY ensemble. 2 - Put off shopping because making pumpkin cheesecake is more important. 3 - Realize it’s October 31st. 4 - Slap on cat ears for the 5th year in a row and call it a night.
If this sounds familiar to you, it’s time for an intervention. This Halloween, let’s break the curse of the costume repeat! Using the Anastasia Beverly Hills Soft Glam Palette, I have created 5 last-minute makeup looks that will have you ready for Hallo-weekend in less time than it takes to unwrap your favorite candy.


Shades used from the Soft Glam Palette:
  • Tempera: Beige with a matte finish
  • Glistening: Champagne gold with a shimmer finish
  • Orange Soda: Pastel tangerine with a matte finish
  • Rose Pink: Rose gold with a shimmer finish
  • Sultry: Mahogany with a metallic finish
  • Bronze: Molten gold with a metallic finish
  • Mulberry: Merlot with a matte finish
  • Fairy: Bright gold with a shimmer finish
  • Burnt Orange: Brown-toned orange with a matte finish
  • Sienna: Terra cotta with a matte finish
  • Rustic: Warm cinnamon with a matte finish
  • Cyprus Umber: Coffee brown with a matte finish
  • Noir: Carbon black with a matte finish

1. Orange and Black Smoky Eye with Cobweb Accents

Combine the colors of the season to create a harvest-inspired smoky eye with a cute spider web detail! Pair with an orange lip and your favorite LBD for a chic Halloween look.
Shades: Orange Soda, Burnt Orange, Rustic, Noir, and Sienna
  1. Using a dense flat brush, apply Rustic all over your entire lid.
  2. With the same flat brush, add Sienna to the center of your lid.
  3. With a blending brush, apply a combination of Orange Soda and Burnt Orange to your crease.
  4. Using a small pencil brush, concentrate Noir on the outer “v” of your eye blending into your crease.
  5. Using an angled eyeliner brush, blend a combination of Orange Soda and Burnt Orange onto your lower lash line.
  6. For a precise cat eye and spider web design, I recommend using the Too Faced Sketch Marker Liquid Eyeliner. Its flexible felt tip is perfect for drawing clean lines!
  7. Opt for a warm-toned orange lipstick similar to Jeffree Star Cosmetics Velour Liquid Lipstick in Pumpkin Pie for the ultimate fall-influenced makeup look!

2. Glam-pire

This ultra-smudged, metallic smoky eye blends rich black and merlot shades with a glimmer of shimmer for a luxurious, yet chilling vampire look! Finish with a vampy lip shade and mesh top for a trendier take.
Shades: Noir, Sienna, Sultry, Mulberry, and Glistening
  1. Using a dense flat brush, buff Sienna onto your eyelids and blend into your crease.
  2. Add Sultry to the center of your lid and on your lower lash line.
  3. Apply Mulberry to your outer “v” and blend into your crease and lower lash line.
  4. Using an angled eyeliner brush, smudge Noir onto your upper and lower lash line, as well as blend into your outer “v.” 
  5. Lightly apply Glistening to your tear ducts.
  6. Create small vein-like designs along your eye contour using the shade Mulberry. For more intense looking capillaries, like those pictured, use a red-hued lip liner, like Charlotte Tilbury Lip Cheat in Walk of Shame, interspersed with hair-like strokes of blue eyeshadow similar to the shade Tiger Lily from the Natasha Denona Tropic Palette.

3. Golden Goddess

Gild your lids, lips—just about anywhere you please with this ultra-glammed version of a mythical deity! Break out a white maxi dress and BOOM! Instant golden goddess.
Shades: Glistening, Rustic, Cyprus Umber, Bronze, and Fairy
  1. Using a dense flat brush, apply a mixture of Glistening and Rustic to your eyelids and lower lash line.
  2. With a blending brush apply Rustic into your crease.
  3. Using a small pencil brush, concentrate Cyprus Umber on the outer “v” of your eye and wing outward.
  4. Using your fingers press Bronze onto the center of your eyelid.
  5. Create a dramatic cat eye using a long lasting liquid eyeliner.
  6. Lightly dot Fairy onto your tear ducts for a soft glow.
  7. Complete the look by adding a glitter-y lip. I recommend Jouer Cosmetics Long-Wear Lip Topper in Molten Gold.

4. Bambi

I’ve discovered that the velvety shades in the Soft Glam Palette work perfectly for full face Bambi-inspired makeup. These eyeshadows blend seamlessly into skin to create a contoured, spotted look to match the doe eyes. Add a brown-toned lipstick and dress in full-on flesh tones to complete this monochromatic mammal look.
Shades: Rustic, Burnt Orange, Cyprus Umber, Noir, Glistening, and Tempera
EYES:
  1. Using a dense flat brush apply Tempera onto the center of your lid, underneath your brow bone, and on your tear ducts.
  2. With a blending brush apply a mixture of Rustic, Burnt Orange, and Cyprus Umber to your crease and blend outward toward your temple to create a winged effect.
  3. Using your fingertips, gently press Glistening onto the center of your lid.
  4. Apply Cyprus Umber on your lower lash line.
  5. Using black liquid liner, apply a slim winged line to your upper lid.
FACE:
  1. Contour cheeks, sides of nose, and forehead with Rustic.
  2. Highlight cheeks with a hint of Glistening.
  3. Using a small pencil brush, create spots on your forehead and slightly below your eye contour with Tempera. For a gentle highlight, add a light dusting of Tempera down the center of your nose.
  4. Using black liquid liner, trace the bottom part of your nose and fill in the tip for a shiny, wet-nose finish.

5. Doll Face

Create eye-popping doll-inspired makeup with a slightly frightening flair! Pair with a deep fuschia-toned lip and collared dress for a look that toys with sweet and scary!
Shades: Tempera, Rose Pink, Orange Soda, Burnt Orange, Rustic, Cyprus Umber and Noir
EYES:
  1. Using a dense flat brush apply, Tempera to the center of your eyelids, inner half of your lower lid, and underneath your brow bone.
  2. Blend a combination of Burnt Orange and Rustic into your crease.
  3. Using a small pencil brush, apply a mixture of Cyprus Umber and Noir to your outer “v.”
  4. Add black liquid eyeliner to your top lid. Trace a curved line slightly below the Tempera application on your lower lid (From step #1), and draw small lashes to create a wide-eyed appearance.
  5. Layer Rustic, Cyprus Umber, and Noir underneath your false lashline.
FACE:
  1. Using an eyeliner brush and the shade Cyprus Umber, create freckles on your cheeks.
  2. Mix Rose Pink and Orange Soda to create a vibrant blush and apply to the apples of your cheeks.
  3. Highlight the top of your nose and cheekbones with Tempera.
  4. Using Tempera and black liquid liner, create lines starting from the corners of your mouth ending just past your chin.

15 Of The Best Makeup Brands In India That Are Trending In 2019

15 Of The Best Makeup Brands In India That Are Trending In 2019 Importance Of Choosing The Right Makeup Before we move on to our rou...